Golf Simulator Projector Throw Ratio: How to Choose the Right Distance
Evidence: Research-led guide. This article explains projector throw ratio using manufacturer-style projector specifications and projection-calculator guidance. It is not based on hands-on testing of a particular projector.
Buying a projector for a home golf simulator is not just about brightness or price. It also has to put the image on your chosen screen from a position that works in your room. That is what throw ratio helps you check.
The useful version is simple: start with the image width you want, then work backwards to the projector position. Do that before you buy, rather than discovering the unit needs to sit in the middle of your hitting area.
What is projector throw ratio?
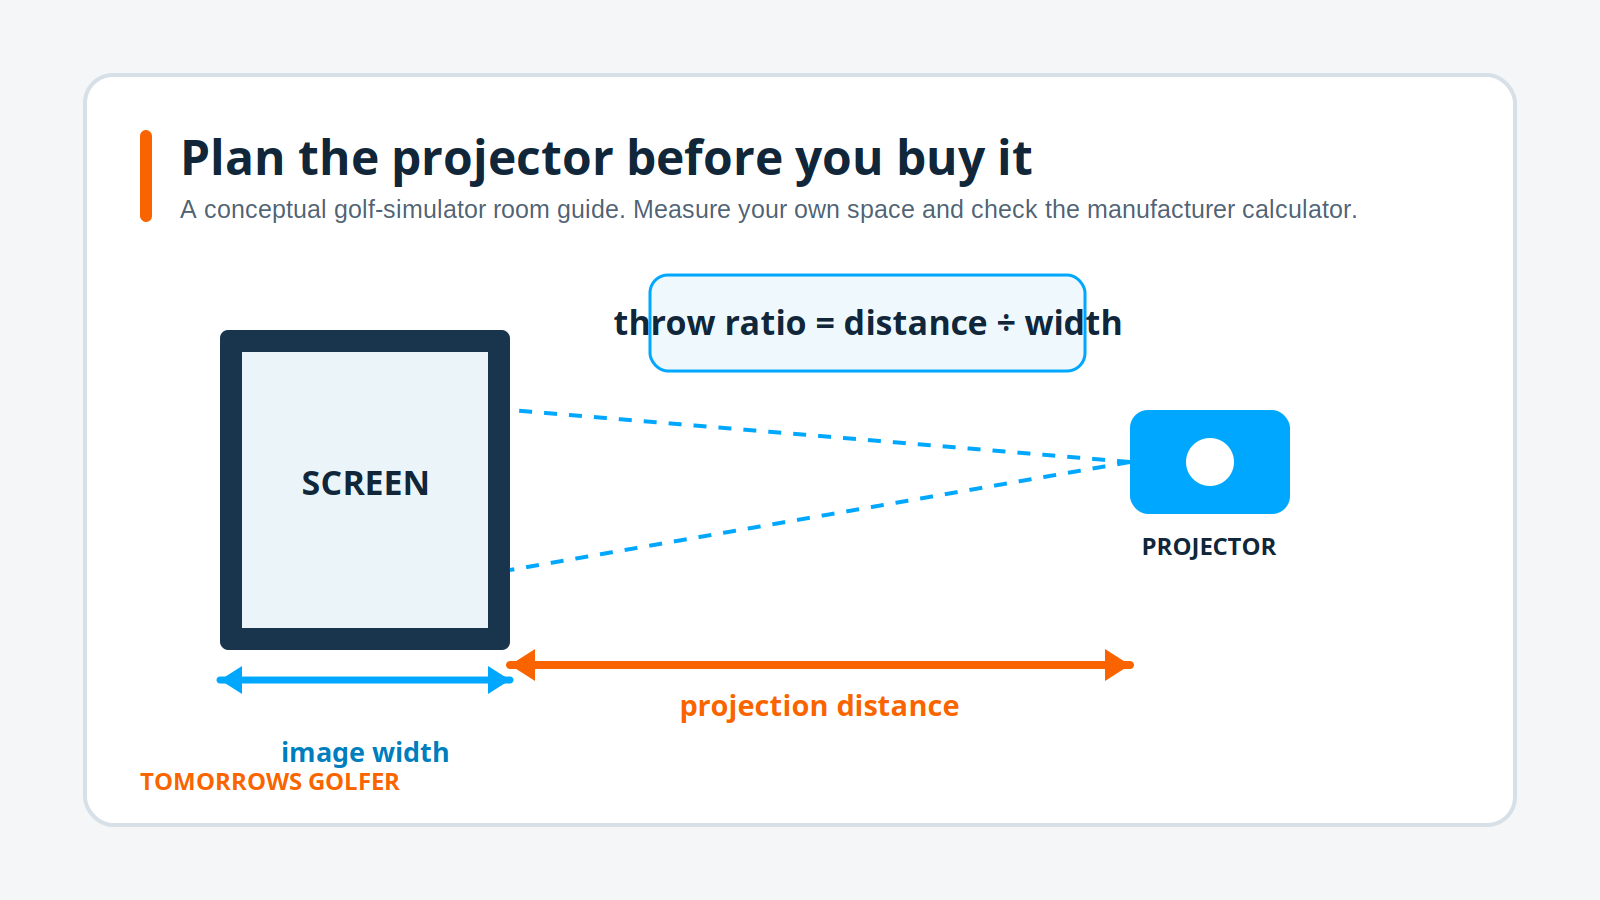
Throw ratio describes the relationship between the distance from a projector lens to the screen and the width of the projected image. Projection-calculator guidance expresses it as:
Throw ratio = projection distance ÷ image width
So a lower number generally means a projector can create a given image from closer to the screen. A higher number needs more room between the lens and screen. The key detail is that the calculation uses image width, not screen diagonal.
Projector specifications often show a single ratio or a range. A range usually means there is optical zoom flexibility. It does not mean every position will suit a simulator room, so treat the published range as a planning tool rather than a guarantee of easy mounting.
How to calculate the distance you need
Use this order:
- Decide the usable image width, not just the screen’s advertised diagonal.
- Find the throw-ratio range in the projector’s current manual, product page or official calculator.
- Multiply the image width by the ratio to estimate the lens-to-screen distance.
- Check whether that lens position leaves safe clearance from the screen, golfer, club swing and any enclosure framing.
For a simple planning example, a 2.4 m-wide image with a 0.49:1 throw ratio needs the lens roughly 1.18 m from the screen. That is an illustration of the maths, not a recommendation or specification for a particular projector.
If a projector lists a ratio range, calculate both ends. That gives you its placement window. Then compare that window with the positions you can actually use in the room.
Measure the right things before shopping
It is easy to measure the wall and stop there. A simulator setup needs a little more thought.
Screen width and usable image area
Measure the width you can genuinely project onto, allowing for the frame, side protection and any part of an impact screen you do not want to use. A wider screen is not automatically better if the projector must then sit where it gets in the way.
Lens position, not the back of the projector
Manufacturers and projection calculators normally base throw distance on the lens. A projector body may extend in front of or behind that point. Check the manual’s diagram before marking a ceiling mount position.
Height, offset and keystone
A projector can have enough horizontal distance and still create an awkward image if its mounting height is wrong. Look for the manufacturer’s guidance on image offset and lens shift. Digital keystone can make an image fit, but it is usually better to plan the mount so you need as little correction as possible.
The golfer’s space
The ideal lens position on paper might clash with the hitting area, a ceiling-mounted enclosure or a golfer’s swing. Keep the projector out of the likely club path and follow the manufacturer’s mounting and ventilation guidance. If you are still working out the room, read our golf simulator room-size guide before committing to a screen or mount.
Short throw or standard throw for a golf simulator?
Short-throw projectors are attractive because they can produce a large image from closer to the screen. In a compact simulator room, that can reduce the chance of the projector sitting above or just behind the hitting zone.
The trade-off is that placement can become more sensitive. A small change in position may make a noticeable difference to the image, and the mount still needs to avoid shadows, impact risk and the golfer’s swing. Standard-throw models can work well where there is plenty of depth, but they need more deliberate room planning.
Neither is automatically the better choice. The better choice is the one whose published placement range matches your available lens-to-screen distance without creating a safety or usability problem.
Common mistakes to avoid
- Using the diagonal measurement in the formula. Convert the intended image to width first.
- Measuring from the projector casing. Use the lens reference point specified by the manufacturer.
- Buying the screen first and checking the projector second. Check both together, alongside the room plan.
- Assuming a zoom range solves every placement issue. It only gives a range of image sizes and distances.
- Relying on a retailer listing alone. Confirm the current ratio, mounting guidance and calculator with the manufacturer before ordering.
A practical pre-buy checklist
- Your measured usable image width
- Your usable lens-to-screen distance
- The projector’s official throw-ratio range
- Mounting height, image offset and lens-shift guidance
- Clearance from the hitting zone and club swing
- A plan for cables, power, ventilation and projector protection
Tomorrows Golfer verdict
Throw ratio is one of the first checks to make when planning a simulator projector, not a technical detail to leave until checkout. It tells you whether the projector can physically work with your intended image width and room depth.
For most home setups, the sensible move is to sketch the screen, hitting position and possible lens location, then run your measurements through the manufacturer’s calculator. If the numbers only work in a place that interferes with the swing area, choose a different projector or revisit the screen size.
Next, see whether a projector is worth including in your build at all in our guide to whether you need a projector for a home golf simulator, and keep the overall spend realistic with our UK golf simulator cost guide.
Sources and further reading
- ProjectorCentral: projection calculator explanation, accessed August 2026. Used for the throw-ratio definition and planning method.
- Optoma GT2000HDR official product page, accessed August 2026. Check the relevant manufacturer page, manual and calculator for any projector you are considering.