Golf Launch Monitor Setup Distance: How Much Space Does Your Device Need?
Evidence: Research-led guide. This article uses current manufacturer guidance as a starting point and is not based on hands-on testing of every launch monitor.
If you are measuring a garage, spare room or garden room for a launch monitor, the easy mistake is to ask one question: “How long is the room?” The useful question is whether your exact device, mode and hitting setup fit safely together.
A launch monitor can need space behind the ball, space in front of it, side clearance for a full swing and headroom. Those zones do not mean the same thing for every device. A room that works for a camera-based unit beside the ball may not suit a radar unit positioned behind it. A range setup can also have different needs from an indoor simulator.
The short answer
Do not buy a launch monitor from a single generic room-length figure. First identify where the device sits relative to the ball. Then measure the device-to-ball zone, the ball-to-net or screen zone, both sides of the hitting area and the full-swing headroom. Finally, check the manufacturer’s current manual for the exact model and mode you plan to use.
That sounds cautious, but it avoids an expensive mismatch. Room size is part of the product decision, not a detail to solve after delivery.
Why “setup distance” is not one measurement
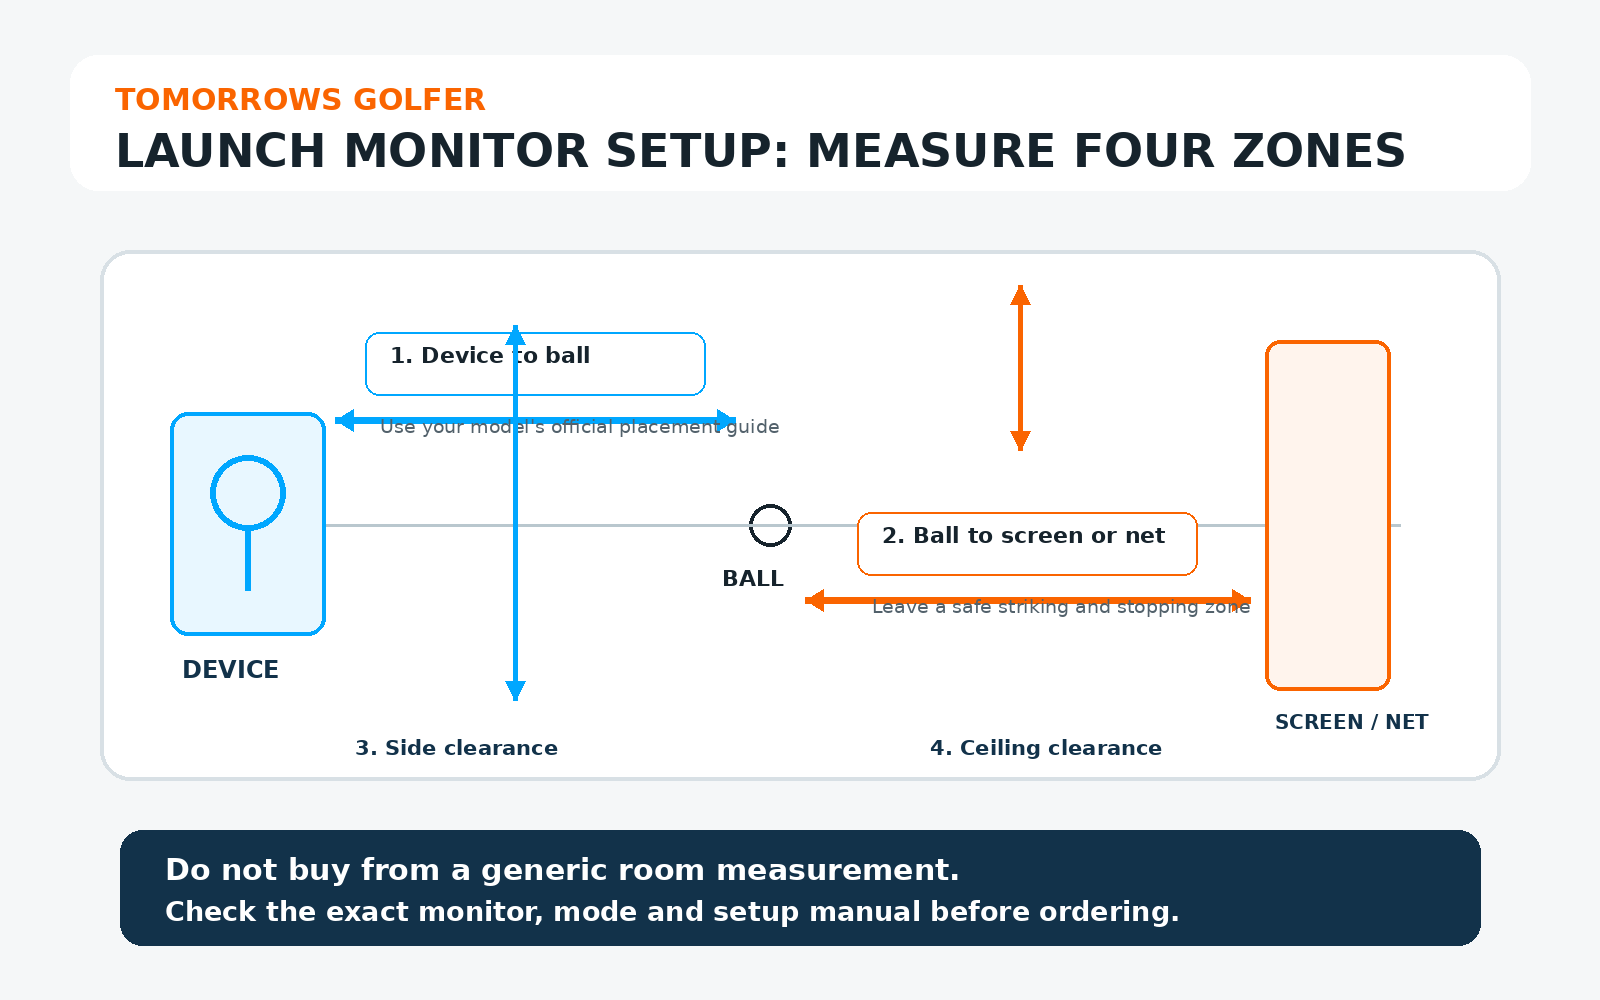
There are four practical zones to map out.
1. Device to ball
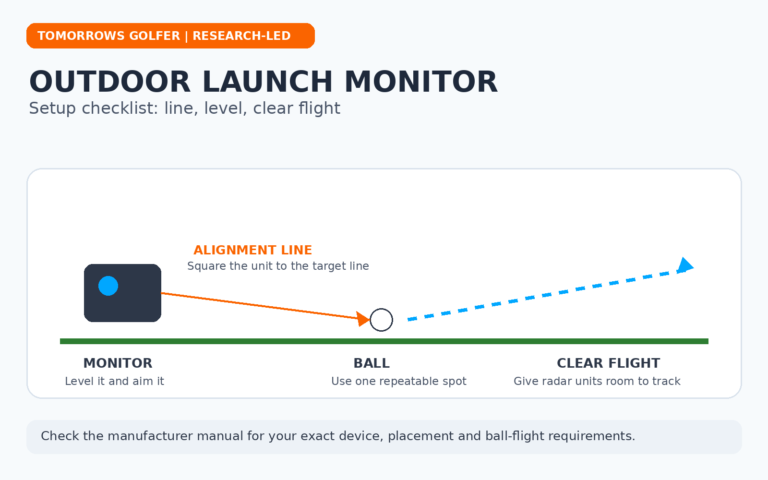
This is the first measurement to check because it is tied to the way a monitor tracks a shot. Some units sit behind the ball, while others sit alongside it. The required placement can also change between indoor and outdoor modes, or when using specific software features.
Use the current official setup material for your exact monitor. Do not assume that the footprint of the unit tells you where it can be placed. A small device can still need a meaningful clear tracking zone.
2. Ball to screen or net
Indoors, the hitting area needs enough room for a safe strike and for the ball to be stopped appropriately. Your screen, net, impact surface and any protective enclosure all affect the usable part of the room.
This measurement is separate from the monitor’s own tracking requirement. A setup can be technically compatible with a monitor yet still feel cramped, put the screen too close, or leave too little margin for a miss-hit.
3. Side clearance
Measure from the ball position, not from the centre of an empty room. Include space for your normal stance, a full backswing and the club on the follow-through. Door frames, shelving, radiators, hanging lights and a low beam matter more than a room’s headline width.
If the setup is mainly for one golfer, mark the ball position and take a few slow practice swings with the longest club you expect to use. If left- and right-handed players will share it, check both orientations before committing to a screen or mat position.
4. Ceiling clearance
Ceiling height is a safety and comfort check, not just a number to tick off. A golfer who feels they have to shorten a swing is unlikely to get much value from a home setup. Check the longest club you will use, your normal finish and any ceiling-mounted projector, light or ducting.
Do this physically where possible. A tape-measure plan cannot show whether a suspended light fitting sits exactly where your club wants to travel.
Radar and camera setups change the order of priorities
Technology type gives you a useful starting point, but it is not a substitute for the official manual.
Radar-based monitors are commonly positioned behind the ball. That can make the full ball-flight zone and the line from monitor to ball especially important in an indoor build. They can be a practical fit for outdoor practice too, where there is more room for the device and ball flight.
Camera-based monitors are commonly positioned beside the ball. That can suit a shorter room in some cases, but it does not remove the need to check hitting, screen, lighting and swing clearance. Camera placement, alignment and the unit’s view of the ball still matter.
For a plain-English overview of that trade-off, see our radar vs camera launch monitor guide. The buying implication is simple: decide on the room first, then shortlist technology that can work in it.
A sensible way to measure your room
- Choose the intended ball position. Do not start from the middle of the room by default.
- Mark the four zones. Device-to-ball, ball-to-impact surface, side clearance and ceiling clearance.
- Measure the obstructions. Include doors, beams, fittings, storage and anything that cannot move.
- Check a normal swing. Use a real club and take slow rehearsal swings. Stop if there is any chance of contact with a surface or fitting.
- Read the official setup guidance before purchase. Confirm the exact product, firmware, mode and simulator arrangement. Manufacturer requirements can change.
- Leave a margin. A plan that fits only on paper is not a comfortable practice space.
Three common buying mistakes
Using total room length as the whole answer
A room can be long enough overall but unusable if the ball position, monitor location and screen cannot coexist with a safe swing. Draw the layout at floor level before comparing products.
Copying someone else’s setup dimensions
Online photos and forum layouts can help you understand the problem, but they are not a compatibility certificate. Their device, software mode, ceiling height and hitting surface may differ from yours. Treat the monitor maker’s current documentation as the source that matters.
Forgetting the rest of the simulator
A launch monitor is only one part of an indoor setup. A screen, net, mat, projector, computer and cable route all take space. Our golf simulator room-size guide helps with the wider room-planning question, while our launch monitor alignment guide covers what to check once the device is in position.
Who this guide is for
This is for golfers planning a first home setup, particularly those deciding between a portable launch monitor for range use and a more permanent simulator arrangement. It is also useful if you have a room already and need to rule out devices that will not fit comfortably.
Who should skip it
Skip a generic guide if you have already chosen a model and have its current manual. Go straight to the manufacturer’s official setup documentation, then measure your room against that. You should also get practical installation advice before making structural changes, mounting equipment or building a permanent enclosure.
Useful official checks before you order
- Read the exact setup and support guidance from your monitor manufacturer, such as Garmin Support, FlightScope Support or the relevant product-support area from your chosen brand.
- Confirm whether guidance changes by indoor, outdoor or simulator mode.
- Check the monitor’s current software and compatibility requirements before buying a PC, projector or subscription.
- Ask a supplier to confirm the intended room layout in writing if they are selling a full package.
Tomorrows Golfer verdict
The best launch monitor for a small space is not automatically the smallest one. It is the one whose documented placement and tracking needs fit your room without compromising a normal swing or a safe hitting area.
Measure four zones, use the official manual for the exact model and leave some breathing room. That is less exciting than choosing from a spec sheet, but it is the step most likely to stop a costly home-simulator mistake.
Frequently asked questions
Can I use a launch monitor in a short room?
Possibly, but the answer depends on the monitor, its placement method, the mode you will use and the space required for a safe swing and impact surface. Check the current official guide for the exact model rather than relying on a general room-length claim.
Do I need a screen to use a launch monitor indoors?
Not always. Some golfers use a net or other suitable impact solution for practice. A screen is part of a fuller simulator experience, but it adds planning requirements around distance, image size and projector placement. Read our net vs impact screen guide before deciding.
Should I choose my launch monitor before planning the room?
It is better to do both together. Start with the room’s real constraints, shortlist suitable monitor types, then confirm each exact product’s placement requirements in its official documentation before buying.